Shared Course Steps is a useful feature of LearnDash. However, there are some situations in which it may not be the best fit for the use case you have in mind.
For example, if you would like to:
- Repeat course steps throughout the same course
- Repeat chunks of content throughout the same individual lesson/topic
- Alter individual lesson settings on a per course basis
Then I have an alternative to Shared Course Steps you may wish to consider. I call the concept: Shared Post Parts.
Before we begin, note that this is an alternative to Shared Course Steps, not something that needs to be used in conjunction with it.
So keep your Shared Course Steps settings as-is and unchanged, as in any case it will not matter for what I’m about to describe.
This concept can be applied to WordPress sites that don’t even use LearnDash.
A quick introduction to the concept
This tutorial is more about a high-level concept rather than a prescription to use any particular tool or method.
Basically, all we want to do:
-
Store our Shared Post Parts in a separate and private part of our WordPress site, away from LearnDash Course Content
-
Devise a way of embedding those Shared Post Parts throughout our WordPress site, inside or outside of LearnDash Course Content
Understand that this is not a LearnDash-specific concept, and the same concept can be applied to a basic WordPress blog.
With that said, I zero’d in on one interesting free WordPress plugin called Post Snippets as a viable option.
Method #1: The “Post Snippets” Method
This is a free plugin available on the WordPress plugin repository.
Search for “post snippets” and it should be the first result, looking something like this:
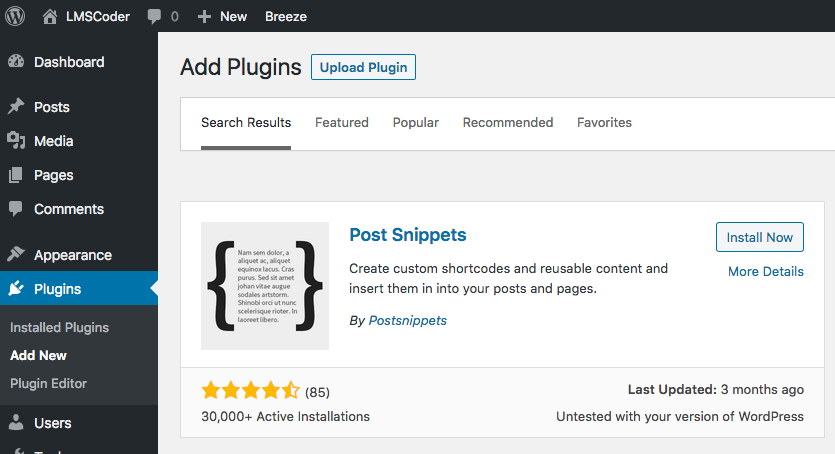
“Plugin Snippets” WordPress plugin
Got that installed? Great! Time to make our first “shared post part” with it!
Step 1: Familiarize yourself with the Post Snippets plugin
I did find the Post Snippets plugin interface to be slightly quirky, so I’d suggest taking a few minutes to review the “Help” section in the top right corner.
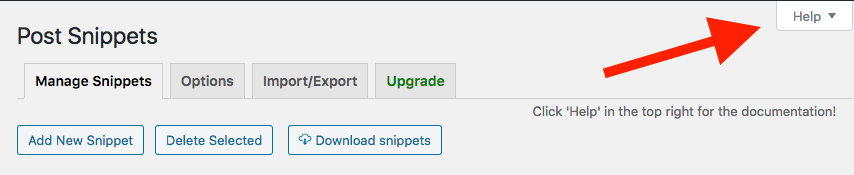
Post Snippets help toggle
Then, make a little snippet and embed it into a post, on your own, to get the hang of things!
Step 2: Make your first “Shared Post Part”
Feel free to copy mine, if you’d like. The use case would be for some sort of fitness course site with repetitive warmup exercises.
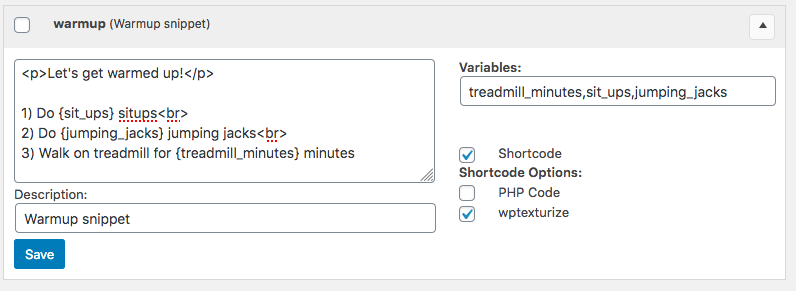
“Post Snippets” example for a fitness course
-
Name: warmup
-
Description: Warmup example
-
Content:
Let's get warmed up!
- Do {sit_ups} situps
- Do {jumping_jacks} jumping jacks
- Walk on treadmill for {treadmill_minutes} minutes
- Do {sit_ups} situps
-
Variables: treadmill_minutes,sit_ups,jumping_jacks
-
Checked: Shortcode, wptexturize
Go ahead and save. Now it’s time to embed the shortcode in a LearnDash Lesson!
A few miscellaneous thoughts before we continue:
- The wpautop does not seem to be applied out of the box, hence, the manual placement of
<p>and<br>elements. This may not be suitable for Shared Post Parts of substantial length. See Method #2 below for an alternative. - Notice there are no spaces between the commas in the Variables field. I noticed that spaces after commas, for example, caused unwanted behavior in the shortcode.
- The Name will serve as the shortcode name. In this case,
[warmup ...], so be sure the shortcode name does not conflict with other shortcode names in use on your site.
Step 3: Embed the shortcode in a lesson
You should find a Post Snippets button in your WordPress editor, which should reveal a modal like this:
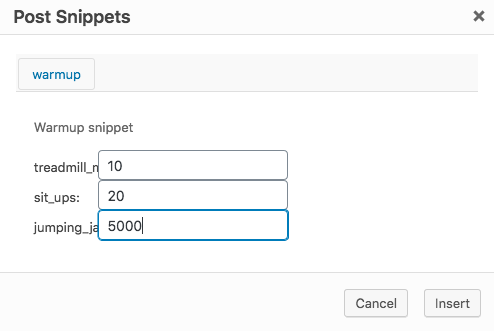
Post Snippets modal. That’s a lot of jumping jacks!
I am unsure why the longer variable names are cut off like that, although it is likely something that can be remedied with some Admin CSS.
I’m not going to worry too much about it, because this modal is more of a “shortcode helper” and not necessary to form the shortcode. It can be written manually.
You should get a shortcode like this:
[warmup treadmill_minutes="10" sit_ups="20" jumping_jacks="5000"]
Which should render on the frontend like this:
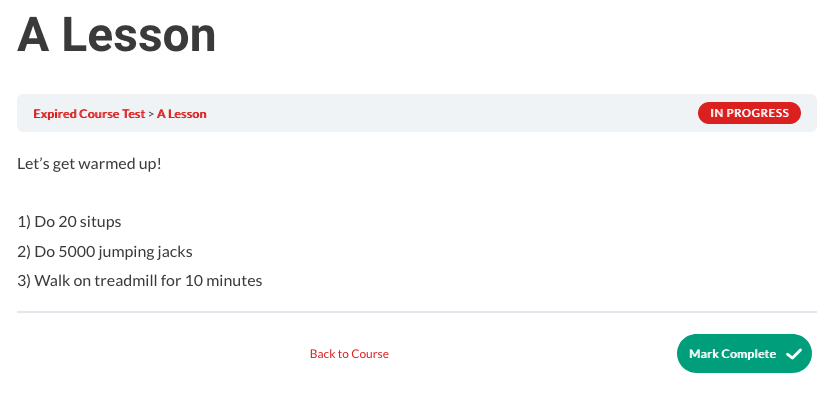
Post Snippets warmup example, on the frontend
Pretty nifty!
This shortcode can be used to include warmups inside of various LearnDash lessons, topics, and even WordPress blog posts and pages.
Can’t think of why you’d want to, although you can include this shortcode multiple times throughout the same post as well.
Method #2: Private CPT + WP Show Posts
Above, I said:
This may not be suitable for Shared Post Parts of substantial length.
Meaning, it may be a waste of your time to manually place <p> and <br> in your content.
While I peeked into the Post Snippets code to see if I could squeeze in wpautop in a manner that didn’t require modifying the core plugin code, I couldn’t find a way.
Perhaps I’ll submit a pull request to them, although they may believe that allowing for wpautop would be beyond the scope of a “snippet” (i.e. a small piece of text).
However, remember what I said above:
this tutorial is more about a high-level concept rather than a prescription to use any particular tool or method.
So if Post Snippets is not a good fit for your use case, consider using another set of tools. For example:
- Register a non-public custom post type with Custom Post Type UI.
- Embed your Shared Post Parts with WP Show Posts
Step #1: Register a private custom post type
For this, we’ll use Custom Post Type UI.
If you have a preferred way of registering custom post types, feel free to use that as long as you’re keeping things private with the settings we’ll discuss below.
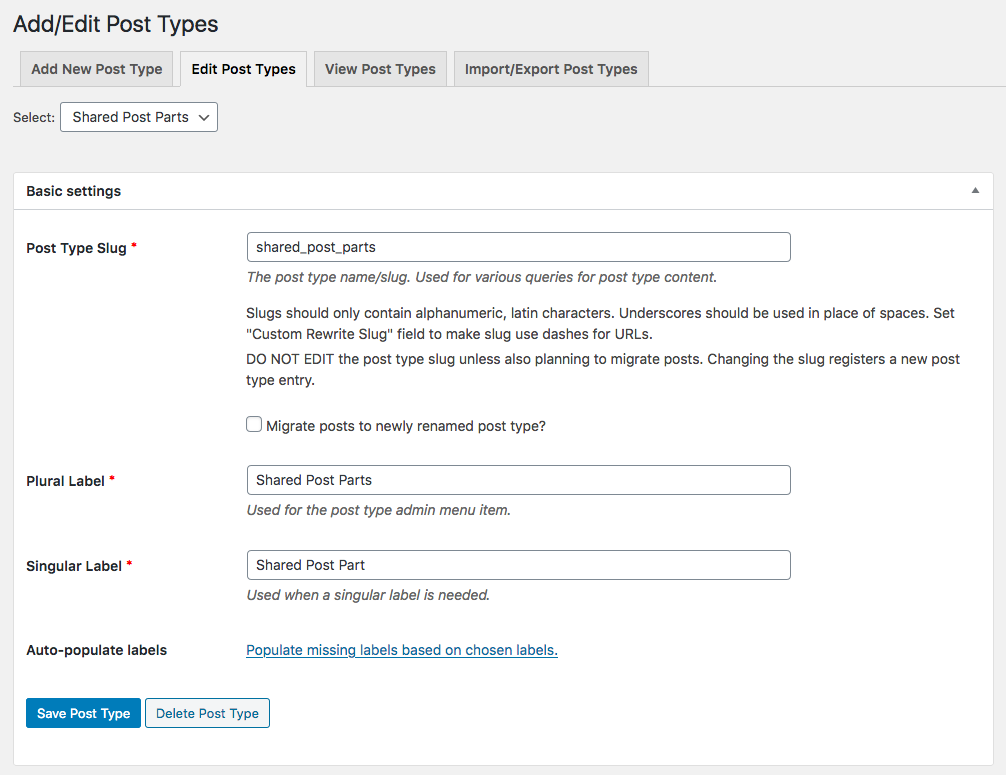
Basic settings for the “Shared Post Parts” post type.
- Post Type Slug: shared_post_parts
- Plural Label: Shared Post Parts
- Singular Label: Shared Post Part
This is all you need to get started, although you’ll probably also want to make sure your Shared Post Parts are not directly accessible (at a URL like example.com/shared_post_parts/slug/).
To do that, set your settings like so:
- Public: True
- Publicly Queryable: False
- Show UI: True
- Show in Nav Menus: False
- Delete with user: False
- Show in REST API: False
- Has Archive: False
- Exclude From Search: True
Not an exhaustive list of all possible CPT settings. Some of these are default settings, and for the rest you should be able to leave as-is.
I found that setting Public to false made it impossible for WP Show Posts to query the post type at all, so that is set to true.
And setting Publicly Queryable to false worked well to prevent direct access.
If you’re dealing with super secret content, you’ll want to double-check if Shared Post Parts are directly accessible, show up in search results or archives, show up in the REST API, etc.
Although the above settings should take care of all that, better safe than sorry!
Step #2: Make your first Shared Post Parts post
Make sure it has lots of paragraphs and single-line breaks so we can test WordPress automatically processing those with wpautop.
I like to use lipsum.com for stuff like this.
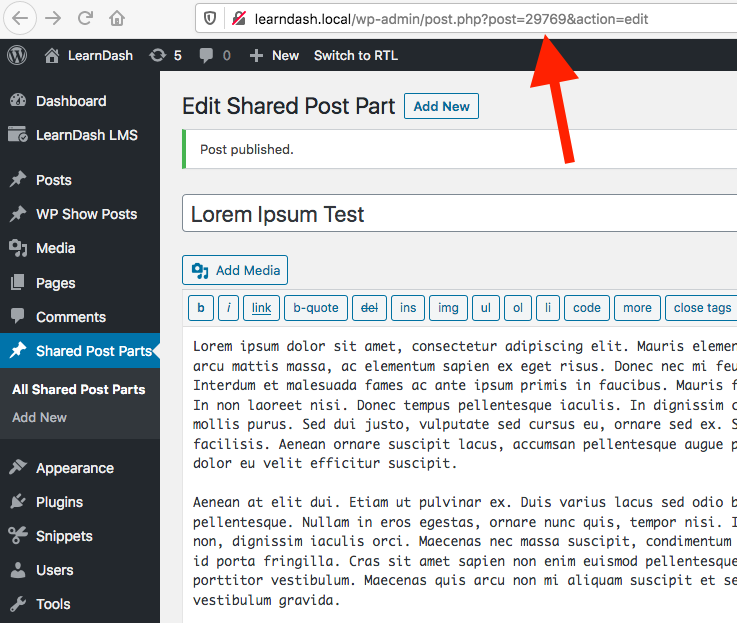
Published “Shared Post Part” with ID pointed out
Publish the post with your content and take note of the post ID number. In this case, it is 29769.
We’ll need that post ID number for the next step.
Step #4: Add new “WP Show Posts” post
Before we continue, I realize it’s a bit clunky to create a post for the sole purpose of referencing another post.
Ideally we could just have a little shortcode like [embed_content post_id=“29769”] although I did find WP Show Posts to be highly-rated, and a viable option for what we’re trying to do.
You will be greeted with an interface like this.
We will be going through each “tab” (Posts, Columns, Images, etc.).
WP Show Posts “Posts” tab settings
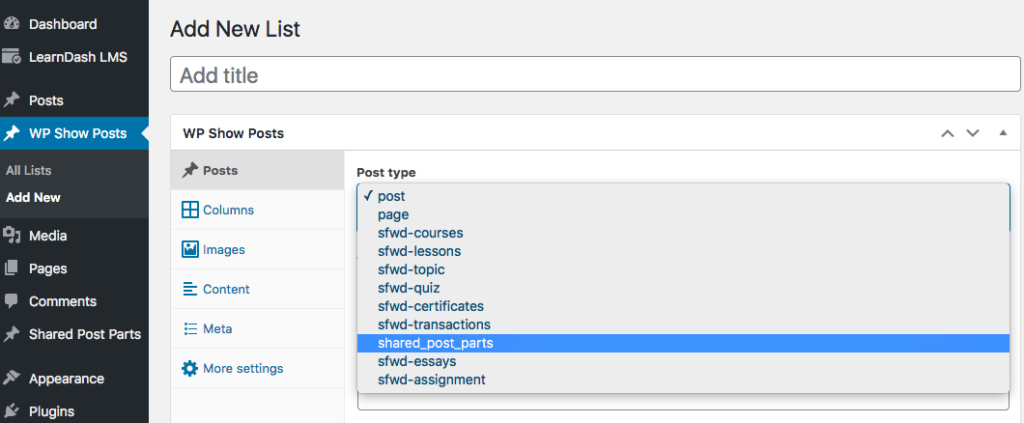
In the “Posts” tab, you’ll want to set the post type to shared_post_parts with 1 post per page. Pagination unchecked.
In the “Columns” tab, you’ll want to set 1 column, with 0 gutter.
In the “Images” tab, uncheck the Images checkbox.
In the “Content” tab, set the content type to Full. Uncheck “Include title.”
In the “Meta” tab, uncheck “Include date.”
In the “More settings” tab, put your post ID (mine is 29769) derived from step #2, in the input field below “Post IDs.”
Now publish and grab the shortcode.
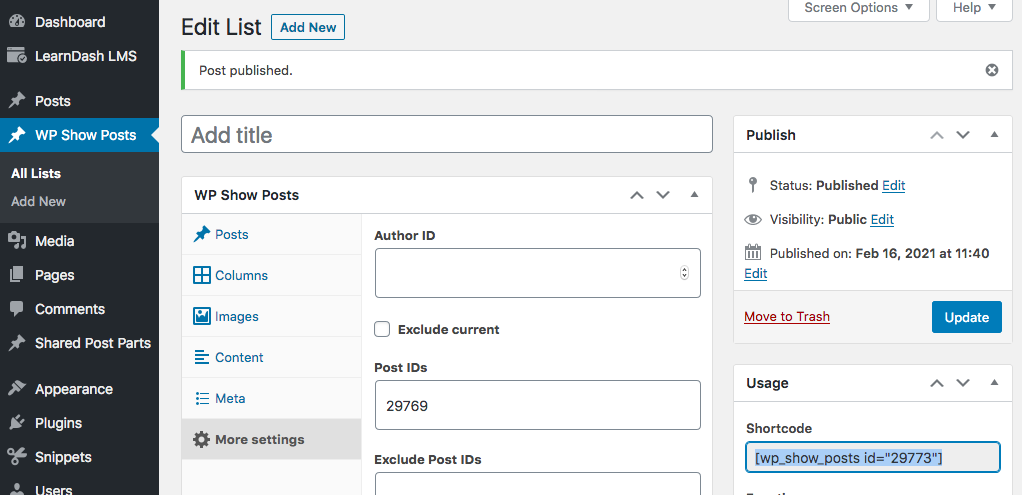
Shortcode example from WP Show Posts
In my case, it is [wp_show_posts id=“29773”].
Like with the Post Snippets shortcode, we can place this shortcode wherever we want in a similar manner.
Throw it into WordPress blog posts, LearnDash lessons, even include the same Shared Post Part multiple times in the same lesson.
Step #5: CSS Cleanup
As you may have noticed from the WP Show Posts tabs (Posts, Columns, Images, etc.) the scope of this plugin goes beyond referencing individual posts.
It wraps the embedded post into a couple different elements, each with their own classes. Depending on your theme, this may require a little bit of cleanup.

WP Show Posts HTML/CSS source code
While it depends on your theme, the following CSS should help in some way:
.wp-show-posts > * {
	padding: 0 !important;
	margin: 1em 0 !important;
}
Some adjustments may be desired depending on your theme, however.
Step #6: Weigh the pros and cons
This is the better option if you want to avoid duplicating large lessons into other lessons, don’t want to manually wrap paragraphs in <p> tags, and are more comfortable using default WordPress editors.
However, it may not be ideal if you need variables, which Post Snippets makes pretty easy.
Remember our Golden Rules. There is often no one-size-fits-all “better” or “worse.”
You just need to weigh the pros and cons, and make a determination as to what’s best for your use case.
Need something else?
The Shared Post Parts concept is a great way to help ensure you don’t repeat yourself.
My experience tells me that people are going to take this concept and do unimaginable things with it.
Like trying to embed entire Elementor templates inside of a Post Snippet, or vice versa, or something on a similar level of unimaginability.
I can’t promise how every conceivable variation of this concept will go, beyond the specific examples as set forth above, so you may have to do some testing on your end to see what happens for whatever you have in mind.
If you can envision a better process for your unique use case, and have a budget for custom development, let me know and I’ll see what I can do to help.