How to display lesson duration in LearnDash without literally writing [1:23] in your titles
Before we begin, let’s clearly define the scope of this tutorial. We will:
- Set up a “seconds” custom field in the backend
- Format the “seconds” data to display a more readable time on the frontend
- Insert the formatted time in via
the_titlefilter
The final result will look in our Course Content block:
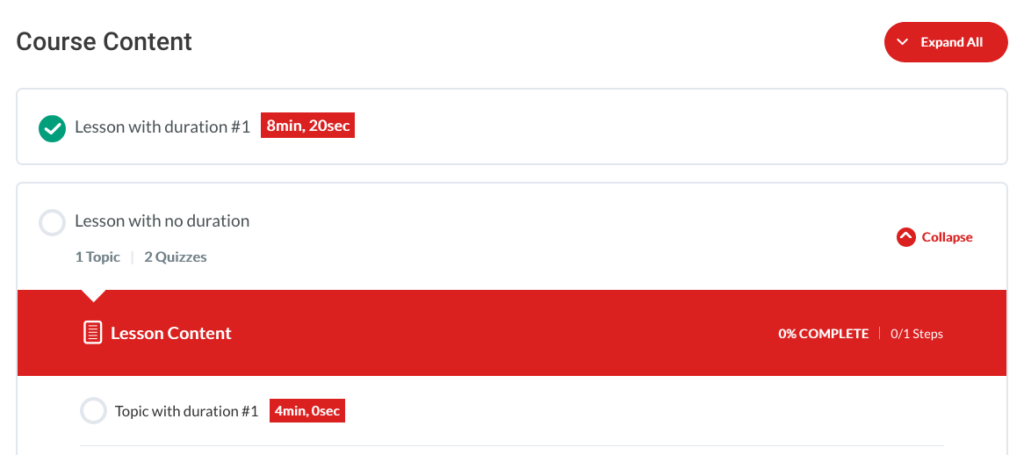
And this in Focus Mode (and the Navigation widget):

We will not be covering any sort of automation, that means:
- We will not set up a one-size-fits-all “words per minute” calculation
- We will not do any sort of per-user “words per minute” setting
- We will not do any sort of per-user reading speed tracking
- We will not query video provider APIs for duration data
- We will not query locally hosted videos for duration data
- We will not be summing the time of lesson substeps
I hope it goes without saying that any of the above “we will not” items would greatly complicate the scope of the tutorial.
We can always get the foundation in place and iterate upon it later.
Step #1: Enable “custom fields” support for Lessons and Topics
Contrary to popular belief, custom fields are a core WordPress feature.
While I am a fan of libraries like ACF and Carbon Fields, we’ll be using the WordPress-built-in custom field functionality.
To enable this core WordPress functionality, add the following PHP code snippet:
add_action( 'init', 'lmscoder_custom_fields_support_learndash' );
function lmscoder_custom_fields_support_learndash() {
	$post_types = [
		'sfwd-lessons',
		'sfwd-topic',
	];

	foreach ( $post_types as $post_type ) {
		add_post_type_support( $post_type, 'custom-fields' );
	}
}
If you opt to use a custom fields library, be sure data is stored/returned in “seconds” (i.e. literally just a number like 127) so you can follow along.
Step #2: Confirm “custom fields” support for Lessons and Topics
After activating the above snippet, you should see a new “Custom Fields” checkbox option in Screen Options when you’re editing a Lesson.
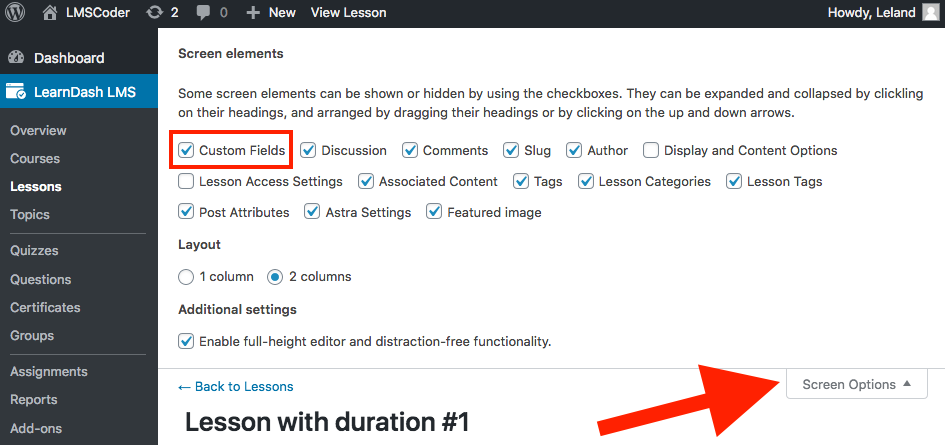
Be sure to check it off if it is not already.
Step #3: Add duration_in_seconds key-value pairs
After enabling Custom Fields screen option, you’ll see a new panel in your Edit screen.
Go to all the Lessons and Topics you’d like to add duration_in_seconds to, and add a value.
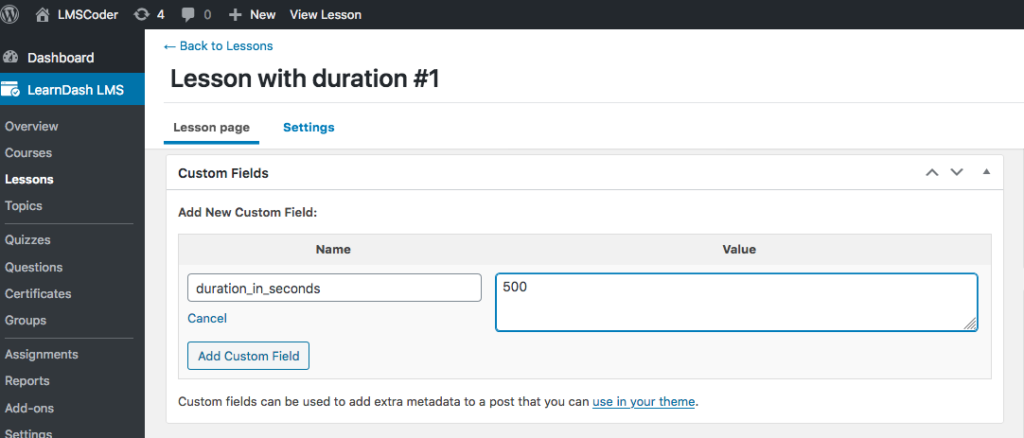
For example, in this Lesson, I added a value of 500 to the duration_in_seconds key (sometimes referred to as a Name).
Step #4: Display the data
We’ll worry about formatting (making the time look readable) and styling (making the time look good) in the later steps.
Step #4.1: Add a helper function to get duration
This might seem a bit silly right now, although it will come in handy when it comes to formatting.
// Helper function to return duration
function lmscoder_get_duration( $post_id ) {
	return get_post_meta( $post_id, 'duration_in_seconds', true );
}
Instead of wrapping each instance of the post meta with a formatting function, we can do it in one place.
Step #4.2: Display the data by filtering the_title
There are a number of ways to display the data. There may be a hook available. You could always override a template.
However, when it came to this use case, I decided filtering the_title worked well enough and keeps this tutorial simpler.
To display the data for any post with the duration_in_seconds custom field key, add this onto your existing snippet:
// Display duration in lesson row
add_filter( 'the_title', 'lmscoder_add_time_to_title', 10, 2 );
function lmscoder_add_time_to_title( $title, $id ) {
	$formatted_time = lmscoder_get_duration( $id );

	if ( $formatted_time AND ! is_admin() ) {
		$title = $title . '<span class="course-step-duration">' . $formatted_time . '</span>';
	}

	return $title;
}
Note that the time is not formatted yet, we’re just naming variables in our code as if it were because we will be formatting time in an upcoming step.
Step #4.3: Observe the effects
Filtering the_title is not an ideal option because it filters each and every output of a WordPress post title.
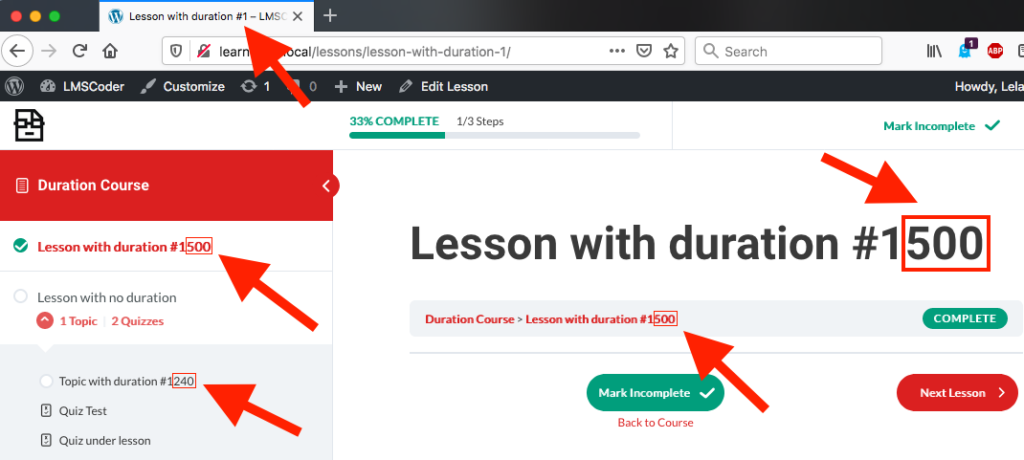
There is no distinction between titles in Focus Mode navigation, and the main heading of an individual Lesson post or breadcrumb item.
There isn’t even any distinction between frontend and backend, although that was addressed with the AND ! is_admin() check in the snippet.
If it wasn’t, our backend could look like so:
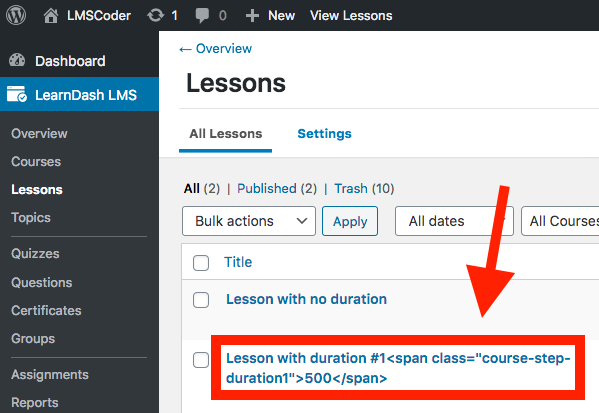
Note that HTML is escaped, which is why the HTML is seen like that.
Step #4.4: Style the time
Our goal is to only show duration in the Focus Mode sidebar (i.e. the Navigation widget), and the Course Content block.
Since titles can show up in a lot of places, we’ll default to hiding all .course-step-duration elements with the display: none !important; rule.
.course-step-duration {
	display: none !important;
	background: #db2020;
	color: #fff;
	font-size: 90%;
	padding: 5px;
	margin-left: 10px;
	font-weight: bold;
	display: inline-block;
	line-height: 1;
	position: relative;
	top: -.1em;
}
Also included are some visual styles, that you may want to tweak on your own to better fit your site.
Then use CSS to unhide it where we want it to be shown.
.ld-course-navigation .course-step-duration,
.ld-item-list .course-step-duration {
	display: inline-block !important;
}
If you’re using a theme that overrides LearnDash templates like BuddyBoss, you may need to adjust the selectors to account for that.
At this point, we start to see things take shape.
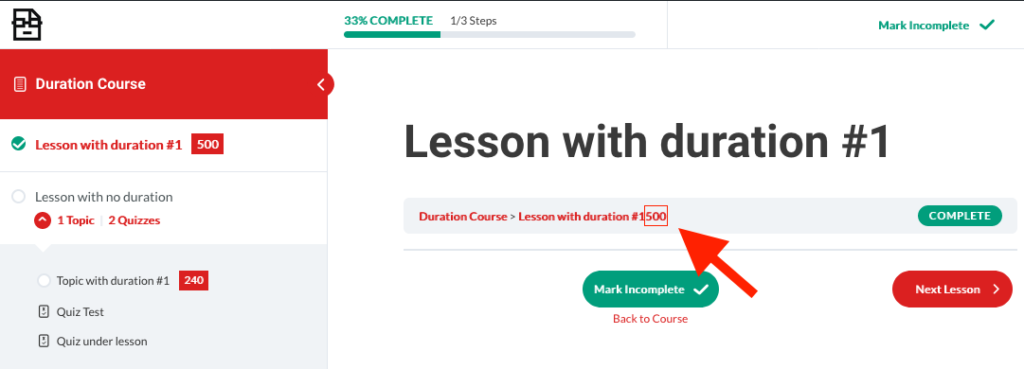
We will circle back to breadcrumbs later, because out-of-the-box, HTML (and therefore, our CSS selector) is stripped out.
Step #4.5: Format the time
We’re going to assume your lesson durations can be measured in hours, minutes, and seconds.
If your lesson durations last days, weeks, months, or years…consider shortening your lesson duration because that seems like a pretty long time for a single lesson to last.
I whipped up a small helper function that I hope is easy enough to read.
// Helper function to format time in seconds
function lmscoder_seconds_to_time( $seconds ) {
	$seconds = intval( $seconds );

	$hours = floor( $seconds / HOUR_IN_SECONDS );
	$minutes = floor( ( $seconds / 60 ) % MINUTE_IN_SECONDS );
	$seconds = floor( $seconds % MINUTE_IN_SECONDS );

	$time = '';

	if ( $hours >= 1 ) {
		$time .= $hours . 'hr, ';
	}

	if ( $minutes >= 1 ) {
		$time .= $minutes . 'min, ';
	}

	$time .= $seconds . 'sec';

	return $time;
}
There are many ways of formatting time. Basically, you pass this function a number of seconds, and a time formated like “1 hr, 5 min, 30 sec” is returned.
We’ll also alter our previous helper function to incorporate this one. So change your lmscoder_get_duration function to look like this:
// Helper function to return duration
function lmscoder_get_duration( $post_id ) {
	$seconds = get_post_meta( $post_id, 'duration_in_seconds', true );

	if ( ! $seconds ) {
		return false;
	}

	$formatted_time = lmscoder_seconds_to_time( $seconds );

	return $formatted_time;
}
No changes are needed in our lmscoder_add_time_to_title function because it already referenced the lmscoder_get_duration function.
At this point, our Focus Mode sidebar should look like this:
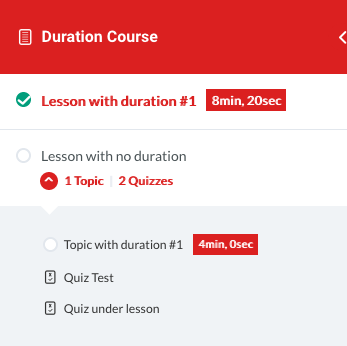
With a similar effect in our Course Content block! Really started to take shape now, just one more step to go.
Step #5: Template override breadcrumbs
The specific template file we’re looking for can be found here: wp-content/plugins/sfwd-lms/themes/ld30/templates/modules/breadcrumbs.php
So open that, and copy the contents over to a new file here: wp-content/uploads/learndash/templates/ld30/modules/breadcrumbs.php
The issue is that the breadcrumbs are a bit overzealous with escaping and stripping tags.
You can resolve this by replacing 33:
<span><a href="<?php echo esc_url( $breadcrumbs[ $key ]['permalink'] ); ?>"><?php echo esc_html( wp_strip_all_tags( $breadcrumbs[ $key ]['title'] ) ); ?></a> </span>
With this:
<span><a href="<?php echo esc_url( $breadcrumbs[ $key ]['permalink'] ); ?>"><?php echo wp_kses_post( $breadcrumbs[ $key ]['title'] ); ?></a> </span>
Basically, replacing the esc_html and wp_strip_all_tags with wp_kses_post.
This function “sanitzes content for allowed HTML tags for post content” according to the WordPress developer documentation.
Step #6: Consider these thoughts
This should be considered a very rough draft and a sampling of what can be done with custom field data in LearnDash.
And when I say “in LearnDash” I really mean WordPress…because the_title is 100% a WordPress thing.
However, if this were for a paid client project, I would likely not use the_title filter and instead opt for template overrides.
As outlined in the “we will not” list above, this concept can be taken a lot further, including automatically grabbing data from video providers like Vimeo.
This is not impossible to do, as Vimeo does have an API that lets you grab duration.
At that point, the app is no longer self-contained and concerns like hitting rate limits need to be considered.
If you have any specific needs not covered by this tutorial, you can hire me and we can work together figuring out a solution for your use case.