Consumers love savings!
When it comes to LearnDash course pages, out of the box, only a single price is displayed, like this:

Default LearnDash course infobar
What we’re going to do, is show a “struck out” original price, and the discounted price, like this:

The LearnDash course infobar after this tutorial
Step #1: Enable custom fields support for courses
As mentioned in our display lesson duration tutorial, custom fields are a core WordPress feature.
While I am a fan of libraries like ACF and Carbon Fields, we’ll be using the WordPress-built-in custom field functionality.
To enable this core WordPress functionality on the LearnDash course post type, add the following PHP code snippet:
add_action( 'init', 'lmscoder_custom_fields_for_learndash_courses' );
function lmscoder_custom_fields_for_learndash_courses() {
	add_post_type_support( 'sfwd-courses', 'custom-fields' );
}
Step #2: Confirm “custom fields” support for Courses
After activating the above snippet, you should see a new “Custom Fields” checkbox option in Screen Options when you’re editing a Course.
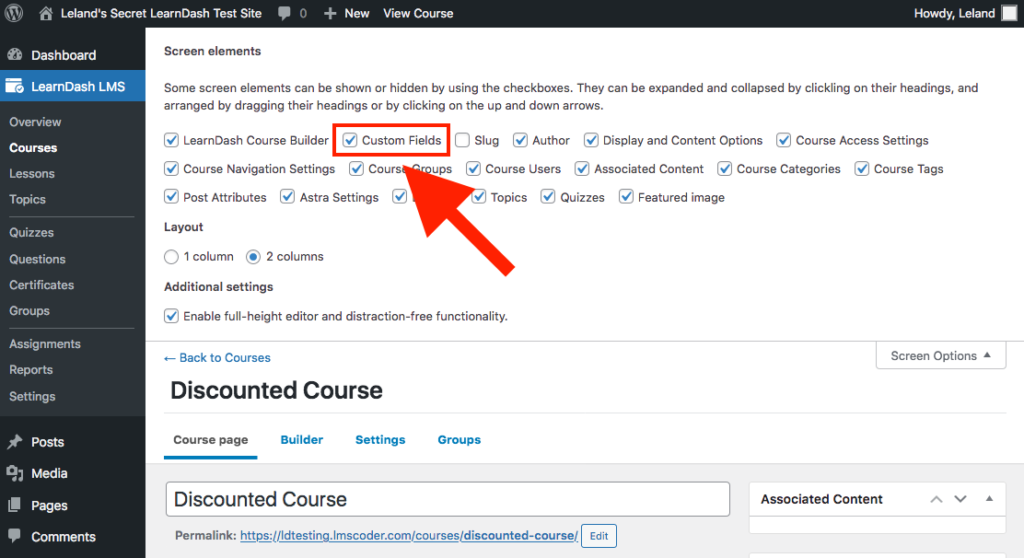
Check of the “Custom Fields” box in Screen Options.
Be sure to check it off if it is not already.
Step #3: Add original_price key-value pairs
After enabling Custom Fields screen option, you’ll see a new panel in your Edit screen.
Go to all the Courses you’d like to add original_price to, and add a value.
Add $200 to the original_price custom field key.
For example, in this Course, I added a value of $200 to the original_price key (sometimes referred to as a Name).
Step #4: Display the data
Now comes time to display the original price.
To keep things simpler, we’ll leverage a couple hooks built into the templates.
For more complicated customization, a template override may be necessary.
Step #4.1: Add a helper function to get original price
Add this as a PHP code snippet:
// Helper function to return original price
function lmscoder_get_original_price( $id ) {
	return get_post_meta( $id, 'original_price', true );
}
Step #4.2: Display the data through hooks
Even though these are technically two separate functions, we’ll include them in the same step because one of them involves opening a div, and the other involves closing it.
We want to make sure we’re not opening a div without ever closing it, so best to keep these two functions close by one another.
function lmscoder_original_price_open( $post_type, $course_id ) {
	$original_price = lmscoder_get_original_price( $course_id );

	if ( $original_price ) {
		$html = '
		<div class="lmscoder-price-wrap">
			<div class="lmscoder-price-wrap__item">
				<span class="ld-course-status-label">Original Price</span>
				<div class="lmscoder-price-wrap__original">' . $original_price . '</div>
			</div>
			<div class="lmscoder-price-wrap__item">';

		echo $html;
	}
}
add_action( 'learndash-course-infobar-price-cell-before', 'lmscoder_original_price_open', 10, 2 );

function lmscoder_original_price_close( $post_type, $course_id ) {
	$original_price = lmscoder_get_original_price( $course_id );

	if ( $original_price ) {
		$html = '
			</div><!-- /.lmscoder-price-wrap__item -->
		</div><!-- /.lmscoder-price-wrap -->
		';

		echo $html;
	}
}
add_action( 'learndash-course-infobar-price-cell-after', 'lmscoder_original_price_close', 10, 2 );
At this point, your course infobar should look something like the following:

LearnDash course infobar with unstyled original price.
Let’s clean it up with CSS!
Step #4.3: Style the data
.lmscoder-price-wrap {
	display: inline-flex;
}

.lmscoder-price-wrap__item:first-child {
	padding-right: 10px;
}

.lmscoder-price-wrap__item:last-child {
	padding-right: 10px;
}

.lmscoder-price-wrap__original {
	text-decoration: line-through;
}
At this point, your course (with a original_price custom field) infobar should look something like this:
The LearnDash course infobar after this tutorial
BONUS Step #4.4: Change “Price” label if original price is set
Reserved For Pro: This section will be soon for LMSCoder Pro members only. If you’re reading this, be sure to save this page.
For more info on our upcoming Pro memberships, subscribe to our newsletter at the bottom of this page.
What if you wanted to dynamically change the “Price” label to something like “Launch Price” or “Introductory Price” but only if an original price is set?
That way, you can communicate the listed price is time-limited in nature.
I looked into it, and unfortunately a pure PHP snippet is out of the question. We’d need to rely on JavaScript for this, or we’d need to override the entire template.
Here’s my take on a JavaScripty way of doing this:
function lmscoder_price_label_adjuster() {
	// Go away if we're not on a course page
	if ( ! is_singular( 'sfwd-courses' ) ) {
		return;
	}

	// Go away if there is no "original price"
	$id = get_queried_object_id();

	if ( ! lmscoder_get_original_price( $id ) ) {
		return;
	}
?>
	<script>
		const CSS_PREFIX = 'lmscoder-price-wrap';
		const LAUNCH_PRICE_LABEL = 'Launch Price';

		function labelAdjuster( element ) {
			const originalPrice = element.querySelector( '.' + CSS_PREFIX + '__original' );

			if ( ! originalPrice ) {
				return;
			}

			const launchPriceLabelEl = element.querySelector( '.ld-course-status-price' )
			.closest( '.' + CSS_PREFIX + '__item' )
			.querySelector( '.ld-course-status-label' );

			launchPriceLabelEl.textContent = LAUNCH_PRICE_LABEL;
		}

		const priceWraps = document.querySelectorAll( '.' + CSS_PREFIX );

		priceWraps.forEach( element => labelAdjuster( element ) );
	</script>
<?php
}
add_action( 'wp_footer', 'lmscoder_price_label_adjuster' );
Fatal Error Alert: Note that we’re leveraging the lmscoder_get_original_price function defined in the snippet underneath step #4.1
If you renamed that for whatever reason, be sure to rename it here too, otherwise be prepared to become the mayor of Fatal Error City.
After implementing the snippet, your course infobar should look like this on discounted courses:

LearnDash course infobar with “Launch Price” label.
And this on non-discounted courses:
Default LearnDash course infobar
Note the label is “Launch Price” on the discounted course, and “Price” on the non-discounted course. A nice touch.
Next Steps
I realize this looks a bit drab. I’m not a designer.
The point of this tutorial is to show you how to communicate a price discount in a simple way, without needing to hire a programmer.
There are some further places you may want to take this concept. For example:
- Automatically calculating a percentage off.
- Pulling “original price” data from a non-LearnDash source, like an ecommerce system.
Note that pulling data from non-LearnDash sources would likely mean you wouldn’t use the custom field anymore. Ideally, data like this would come from a “single source of truth” to avoid potential price display mistakes.
If you feel like you need something more, you can hire me and we can work on something together. If you have a design in mind, be sure to include a screenshot!